
WEBD 150 – Styling Forms
April 4, 2024 1:48 pm Leave your thoughtsForms
Collecting information online from users can be done with forms, these add interactivity for users and allow website owners to collect data from users. There are many different methods that can be used with forms as well as different 3rd party services and generators that can streamline forms for you. This can be a very important aspect of development and online business as a whole as your visitors input can be very valuable. Forms work together with PHP on the back end but for now we will learn the front end aspects of making and controlling forms.
Form Input Types
There are an array of different kinds of forms that you can deploy when needed and the one you ultimately choose will depend on what you need.
- Text Input – Provides a single line for short text input
- Text Area – Provides a text area where more robust text can be input (WYSIWYG Available)
- Password Input – For password inputs
- Radio Buttons – Provides an array of answer options to choose from but only one can be chosen
- Check Boxes – Provides an array of answer options where multiple choices can be chosen
- Drop Down Boxes – Displays a drop down box with an array of answers to choose from but only one can be chosen
- File Upload – Allows the user to upload an image (Image types can be restricted to a certain format)
- Date Inputs – Allows the user to choose a date with calendar
- File Inputs – Allows the user to upload a file
- Submit Buttons – The button that will perform the final action and submit the data
- Image Buttons – Same as submit buttons but these are more custom and act as the submit button would
How does a form work?
Last semester we played with adding form elements to pages but we never got into it. So lets start from the top!
Basically, forms send input data from one computer to another. In HTML it can use 2 methods which we will discuss.
An HTML form has 2 parts.
- The front end (HTML) part that handles the presentation. This is what the user directly interacts with and uses to send.
- The back end processing (PHP, ASP) part that handles the submission of the information sent. Saving, sending of the information.
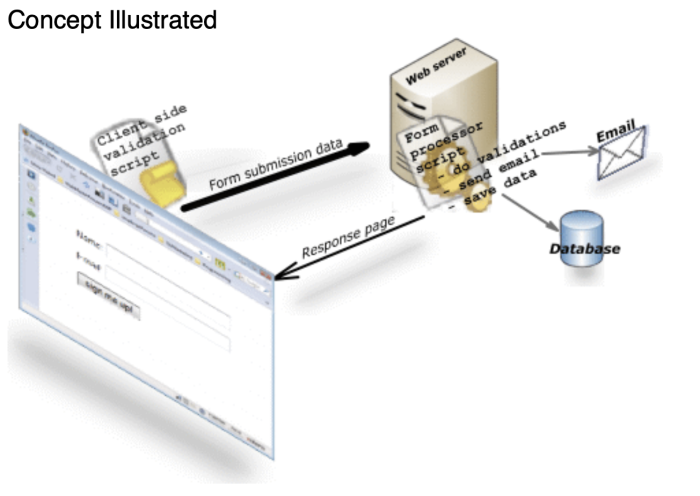
The user fills out the form(s) displayed on a web page and presses the “submit” button > The data upon submission is sent to a web server > A script (PHP) written to process that information sent does so > A response is sent back to the front end user.
From the top
Every form starts with an opening and closing <form></form> tag…
<form>
  All of the forms contents will go in here as you build it
</form>
We can now add attributes to the form within the opening <form> tag. In doing so we will tell the form what method to use to process our data.
Action and Get / Post
action:
The action attribute points to the (back end) server side script that processes the submission of data. This is a PHP, ASP, Perl or CGI script.
method (get or post):
<form method="get"> (default method) method sends data from the website to the server in the browser’s URL bar. This method is not recommended for sensitive data or for things like text area fields. Because there are limitations on how much data can be sent over the URL for example, if there is a lot of text sent in a text area form some of the data will get cut and not received on the other end. For security, if sensitive data such as a password is sent in this method it can be intercepted more easily by a hacker or someone looking at your browser.
<form method="post"> Submits the data to be processed from the HTML form to the identified resource (the script on the server that will process the information).
Example of a form pointing to a PHP script using the get method:
<form action="send.php" method="get">Example of a form pointing to a PHP script using the post method:
<form action="send.php" method="post">Get/Post Restrictions
| Feature | GET | POST |
|---|---|---|
| BACK button/re-submit behavior: | GET requests are re-executed. | The browser usually alerts the user that data will need to be re-submitted. |
| Bookmarked: | Can be bookmarked. | Cannot be bookmarked. |
| Hacked: | Can be hacked. | Not as easily hacked. |
| Cached: | Can be cached. | Not cached. |
| History: | Remain in browser history. | Never remain. |
| Restrictions on form data type: | Yes, only ASCII characters allowed. | No restrictions. Binary data is also allowed. |
| Restrictions on form data length: | Yes, since form data is in the URL and URL length is restricted. | No restrictions. |
| Security: | GET is less secure compared to POST. | POST is safer than GET. |
| Visibility: | GET method is visible to everyone (it will be displayed in the browser’s address bar) and has limits on the amount of information to send. | POST method variables are not displayed in the URL. |
| Large variable values: | 2000 character maximum size. | 8 MB max size for the POST method. |
| Usability: | GET method should not be used when sending passwords or other sensitive information. | POST method used when sending passwords or other sensitive information. |
Field sets and Legend
As we build lets keep things organized. We can do this by creating <fieldset></fieldset> tags and <legend></legend> tags. These tags make groups of fields. Here is an example:
<fieldset>
  <legend>Login details</legend>
  form stuff
</fieldset>

<fieldset>
  <legend>Your Feedback</legend>
  form stuff
</fieldset>
Lets deploy the first field set and legend.
<form action="send.php" method="post">
  <fieldset>
    <legend>Tell us who you are!</legend>
  </fieldset>
</form>
Input Type
This defines what kind of form field we want to use as defined above in Form Input Types.
<input type="text">ID
Just as we can assign IDs as we learned before, we can give form fields IDs as well. This will allow the code to reference it when we need to.
<input type="text" id="first_name">Name
Gives a name to the field. The name is used to identify the field on the server side.
<input type="text" id="first_name" name="FirstName">Value
The text you give as value will be displayed by default in the text box.
<input type="text" id="first_name" name="FirstName" value="Please type your first name">Labels
Label tags define the label for an input element. These are important for building accessible forms as they provide improved usability with the mouse. When the user clicks on the contents within the label tags it will toggle the control. The attribute of the label should be equal to the ID of the form field.
<label for="first_name">First Name: </label>
<input type="text" id="first_name" name="FirstName" value="First name">

<label for="last_name">Last Name: </label>
<input type="text" id="last_name" name="LastName" value="Last Name">
Now lets put what we have so far together…
<form action="send.php" method="post">
  <fieldset>
    <legend>Tell us who you are!</legend>
    <p><label for="first_name">First Name:</label></p>
    <p><input type="text" id="first_name" name="FirstName" value="First name"></p>
    <p><label for="last_name">Last Name:</label></p>
    <p><input type="text" id="last_name" name="LastName" value="Last Name"></p>
  </fieldset>
</form>
From here we have started off with a simple form with 1 field set and 2 text fields for First and Last name.
Lets go ahead and add in 2 more field sets with more form fields!
HTML
<!doctype html>
<html>
<head>
  <meta charset="UTF-8">
  <title>Fun With Forms!</title>
  <link href="css/style.css" rel="stylesheet" type="text/css">
</head>
<body>
  <!-- Form Title div -->
  <div class="form-title">Let us get to know you!</div>

  <!-- Form div -->
  <div class="form">
    <!-- Form Start -->
    <!-- Action sends input data to file named send.php using post method -->
    <form action="send.php" method="post">
      <!-- First Field Set Group -->
      <fieldset>
        <legend>Tell us who you are!</legend>
        <p><label for="first_name">First Name:</label></p>
        <p><input type="text" id="first_name" name="FirstName" value="Enter First Name"></p>
        <p><label for="last_name">Last Name:</label></p>
        <p><input type="text" id="last_name" name="LastName" value="Enter Last Name"></p>
      </fieldset>

      <!-- Second Field Set Group -->
      <fieldset>
        <legend>Tell us about you!</legend>
        <p><label for="age">Age:</label></p>
        <p><input type="text" id="age" name="Age" value="Enter Age"></p>
        <p><label for="phone">Phone:</label></p>
        <p><input type="tel" id="phone" name="Phone" value="Enter Phone #"></p>
        <p><label for="email">Email:</label></p>
        <p><input type="email" id="email" name="Email" value="Enter Email"></p>
      </fieldset>

      <!-- Third Field Set Group -->
      <fieldset>
        <legend>What do you like to do?</legend>
        <p>
          <label for="swim">Swim</label>
          <input type="checkbox" id="swim" name="swim" value="swim">
          <label for="bike">Bike</label>
          <input type="checkbox" id="bike" name="bike" value="bike">
          <label for="drive">Drive</label>
          <input type="checkbox" id="drive" name="drive" value="drive">
          <label for="snowboard">Snowboard</label>
          <input type="checkbox" id="snowboard" name="snowboard" value="snowboard">
          <label for="baseball">Baseball</label>
          <input type="checkbox" id="baseball" name="baseball" value="baseball">
        </p>
        <input type="submit" name="submit" value="submit">
      </fieldset>
    </form>
  </div>
</body>
</html>
CSS
/* CSS Document */
body {
  font-family: Gotham, "Helvetica Neue", Helvetica, Arial, sans-serif;
}

fieldset {
  font-size: 18px;
  border-radius: 15px; /* Rounded border*/
  border-color: #000;
  background-color: lavender;
}

/* Pseudo changes the colour of the individual fieldset when mouse hovers over it */
fieldset:hover {
  background-color: #CEDAFF;
}

legend {
  font-size: 24px;
  font-weight: 300;
}

.form-title {
  margin: 0 auto;
  font-size: 24px;
  color: #000;
  font-weight: 300;
  background-color: #fff;
  width: 500px;
}

.form {
  margin: 0 auto;
  border: 10px;
  border-radius: 15px; /* Rounded border*/
  border-color: cornflowerblue;
  width: 500px;
}

/* using selector::after or selector::before allows you to add content either before or after using CSS but use it sparingly*/
/* Pseudo adding text AFTER the form saying "Thank You!" */
.form::after {
  font-size: 24px;
  color: #000000;
  font-weight: 300;
  content: "Thank You! :-)";
}

/* Styles all input fields */
input {
  background-color: azure;
  color: #000;
  font-size: 15px;
}

/* Pseudo class that changes the input field when you hover over it */
input:hover {
  background-color: ghostwhite;
  box-shadow: 0px 0px 7px 0px rgba(21,127,219,.63);
}

/* Pseudo class that changes the input field when you select it */
input:focus {
  background-color: #C9C9C9;
  box-shadow: 0px 0px 7px 0px rgba(21,127,219,.63);
  border-color: #4ab1ff;
}
Form Generators
There are form generators online you can use to build forms as well. But it is good to know how to build one up on your own too…
These tools can save a lot of time and generate you out code snippets that you can paste into your HTML pages.
Resources
Form Objects
https://www.xul.fr/javascript/form-objects.php
CSS Before and after
https://css-tricks.com/almanac/selectors/a/after-and-before/
Combinators
https://www.w3schools.com/Css/css_combinators.asp
Pseudo Classes for Input Elements With Examples
http://webdevzoom.com/pseudo-classes-for-input-elements-with-examples/
Categorised in: Lectures, WEBD 150
This post was written by amax