
WEBD 100 & MDCP 102- Intro to HTML 1
April 2, 2024 12:01 pm Leave your thoughtsINTRO TO HTML 1
Building Web Page Basics
In this lecture, we will be taking a very basic look at HTML web pages, how HTML works and how to structure a blank webpage as a starting point. This lecture is designed to give you a basic understanding on how a webpage works, what different elements are doing and give you the tools to actually build a basic webpage. We will also cover some terms so you understand what they are if you ever come across them.
What is HTML?
- HTML is the standard markup language for creating Web pages.
- HTML stands for Hyper Text Markup Language
- HTML describes the structure of Web pages using markup
- HTML contains the content of a web page
- HTML elements are the building blocks of HTML pages
- HTML elements are represented by tags
- HTML tags label pieces of content such as “heading”, “paragraph”, “table”, and so on
- Browsers do not display the HTML tags, but use them to render the content of the page
Essentially, a static website is just a construct made up of singular webpages written in HTML and linked to each other. Every website starts with an index page. The index.html file is always the go-to page on a website. This is also known as the home page. Let’s say you have a website URL www.yoursite.com when the user goes to the home page address, the content that will show on arrival to the root address will be the index.html file. Then, that file could have navigation (about us, contact us and so on), leading to the other webpages in the website.
*Note it is good practice to have the logo in the header to link to the home page. This is not a 100% standard but it is done in most cases.
Editors
First off, to write HTML or any other code, you will need an editor. There are various editors you can use that range from free to very expensive. If you are a beginner you will probably want to dive in with a free editor. Here are some good ones you can use:
- Visual Studio Code: https://code.visualstudio.com/ (recommended)
- Visual Studio Codium: https://vscodium.com/ (recommended)
- Sublime Text: http://www.sublimetext.com/
- Brackets: http://brackets.io/
- Atom: https://atom.io/
- Coda: https://www.panic.com/coda/
- NotePad++ https://notepad-plus-plus.org/
- Dreamweaver: https://www.adobe.com/products/dreamweaver.html
I suggest you use more than one so you can brag to people that you know how to use all kinds of coding editors and be a super nerd!
A more extensive list of editors: https://en.wikipedia.org/wiki/List_of_HTML_editors
Elements
HTML consists of elements which are represented by opening and closing tags <tag> </tag>
<exampletag> Opens a tag
</exampletag> Closes a tag
And the content of the tag goes within… it could look like this:
<exampletag>(Content)</exampletag>
Or this:
<exampletag>
(Content)
</exampletag>
You can also have tags within tags. This may sound confusing at first but let’s look at a simple example:
<header><h1>Header Text</h1></header>
Or
<header>
<h1>Header Text</h1>
</header>
This line of code is telling the markup that there is a container which is a header, and the text that reads “Header Text” is h1 text.
Elements can be written semantically or non semantically…
Semantic
<header class=”header-section”> (Content goes in here) </header>
Non Semantic
<div class=”header-section”> (Content goes in here) </div>
Both will accomplish the same thing. The only difference between semantic and non semantic tags are that using semantic tags makes sense to both a human and a computer where as non semantic makes sense to only the computer and the human has to remember the meaning of said tag.
| Non Semantic Elements | Semantic Elements |
|---|---|
| <div class=”header”> </div> | <header> </header> |
| <div class=”nav”> </div> | <nav> </nav> |
| <div class=”section”> </div> | <section> </section> |
| <div class=”footer”> </div> | <footer> </footer> |
More On Structure (File name – URL)
As discussed above, the structure starts with an index.html file, then after this we can have other pages. Let’s take a look at the URLs and how they would look if we had a 5 page site with a home page (index.html) an about us page, contact us page, services page and a blog page.
www.yoursite.com – this would be the home page (Name of file – index.html page)
www.yoursite.com/about.html – this would be the about us page (Name of file – about.html)
www.yoursite.com/contact.html – this would be the contact us page (Name of file – contact.html)
www.yoursite.com/services.html – this would be the services page (Name of file – services.html)
www.yoursite.com/blog.html – this would be the blog page (name of file – blog.html)
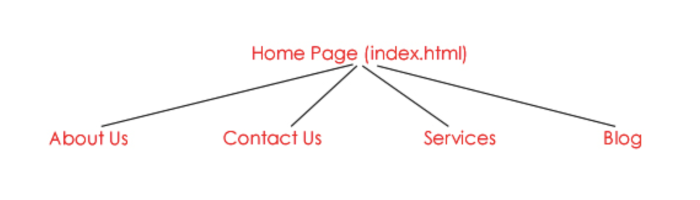
- Home Page (index.html)
- About Us
- Contact Us
- Services
- Blog
As you can see, whatever we name the file, it shows up as such in the web address. You can name an html file whatever you want to but just know that it will show up how it’s named in the web address. If it’s a complicated name it would make it hard for people to remember it.
Starting a Web Page
The structure of a webpage is made up of tags. These tags have opening and closing tags. For example let’s look at the body tag. We always have to have the opening body tag <body> and closing body tag </body> closing tags always have the “/” followed by the tag. There are many different types of tags but now that we have identified how they work, whenever you see a new one you will know it’s a tag because it will have an opening tag < > and closing tag </ >
Example:
<html>
</html>
There are tags that are self closing. The only difference with a self closing tag is that instead of having a closing tag like this </> it just has the >
Example:
<img src=”pathtofile.jpg”>
Let’s take a look at a blank HTML5 webpage. When we make a new document we write this boilerplate to start off.
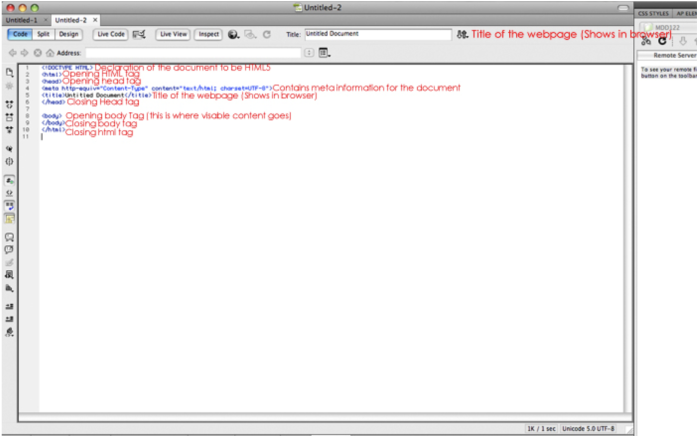
Before we move on let’s explore what we have here.
<!DOCTYPE HTML> – is declaring what kind of document it is. This can be different if we are using HTML5 or W3 standard HTML 4 and so on.
<html> – Is the opening HTML tag. This opens up the entire html page.
<head> – Is the opening head tag. The head tag contains things like meta info, certain scripts and CSS styles, regardless of if they are written inline or imported externally from a CSS file.
<title>This is the title of the web page</title>
<meta name=”description” content=”The content you want as the description”> – This will be where meta page description for search engines goes. Info on here will not be displayed on the actual webpage but will show up in search engines.
An example of META tags in Google:
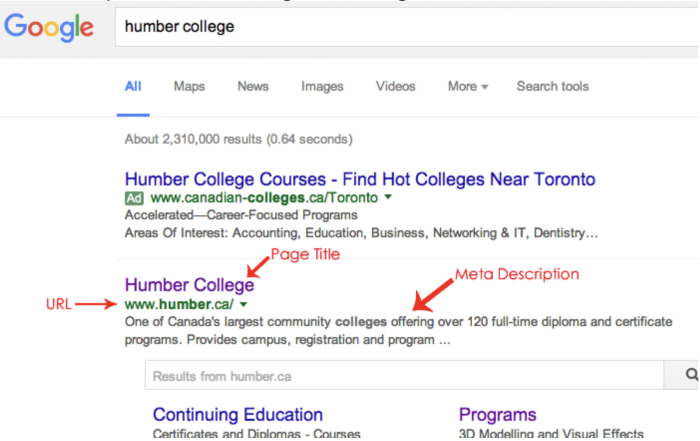
<title> – Will be the title of the document. As we can see above google posts this and it will also show up on the browser where it displays the page title.
</head> – Closes off the head section and allows us to move on to the next section
<body> – This is where all the content you want on the webpage will go. This includes divs, tables, links, images, everything.
</body> – This closes the section where all our content goes.
</html> – This closes off the entire document.
From here we can start working with our document. We would add a space in between the opening and closing body tags and start editing here. Alternatively we could go to design mode in dreamweaver and just start adding in whatever we wanted and dreamweaver would write the code for us. There will be tags within tags, keep this in mind for the next lecture. It may look confusing at first but you will get used to it. For example, in the <body> tag you will have <div> tags and all kinds of other tags.
Differences between “Block” and “Inline” Elements.
In HTML when you are coding, a Block Element always starts on a new line and takes up the full width available on the screen.
Examples of Block Elements:
- <div>
- <h1> – <h6>
- <p>
- <form>
Inline Elements do not start on a new line and only take up the width that is necessary.
Example of Inline Elements:
- <span>
- <a>
- <img>
Let’s take a look at some code and pick this apart:
<!DOCTYPE html>
<html>
<head>
<title>title</title>
<meta charset="UTF-8">
<meta name="description" content="My Website offering some kind of products and services in the area">
<link rel="stylesheet" type="text/css" href="css/style.css">
</head>
<body>
<div class="container">
<div class="header">
<a href="#">Website Name</a>
</div>
<div class="menu">
<ol>
<li><a href="home.html">Home</a></li>
<li><a href="about.html">About</a></li>
<li><a href="contact.html">Contact Us</a></li>
</ol>
</div>
<div class="sidebar">
<h1>Welcome</h1>
</div>
<div class="main">
<h2>Lorem ipsum dolor?</h2>
<p>Praesent aliquam, justo convallis luctus rutrum, erat nulla fermentum diam, at nonummy quam ante ac quam. Quisque ornare risus quis ligula. Phasellus tristique purus a augue condimentum adipiscing. Aenean sagittis. Etiam leo pede, rhoncus venenatis, tristique in, vulputate at, odio. Donec et ipsum et sapien vehicula nonummy. Suspendisse potenti. Fusce varius urna id quam.</p>
<h2>Suspendisse potenti?</h2>
<p>Quisque ornare risus quis ligula. Phasellus tristique purus a augue condimentum adipiscing. Aenean sagittis. Etiam leo pede, rhoncus venenatis, tristique in, vulputate at, odio. Donec et ipsum et sapien vehicula nonummy. Suspendisse potenti. Fusce varius urna id quam. In eget purus. Integer turpis arcu, pellentesque eget, cursus et, fermentum ut, sapien. Fusce metus mi, eleifend sollicitudin, molestie id, varius et, nibh.</p>
</div>
<div class="footer">
©20XX Mywebsite.com
</div>
</div>
</body>
</html>
So what would this bit of code look like? Let’s take a look and we can see visually what Block Elements look like:
Website Name
- Home
- About
- Contact Us
Welcome
Lorem ipsum dolor?
Praesent aliquam, justo convallis luctus rutrum, erat nulla fermentum diam, at nonummy quam ante ac quam. Quisque ornare risus quis ligula. Phasellus tristique purus a augue condimentum adipiscing. Aenean sagittis. Etiam leo pede, rhoncus venenatis, tristique in, vulputate at, odio. Donec et ipsum et sapien vehicula nonummy. Suspendisse potenti. Fusce varius urna id quam.
Suspendisse potenti?
Quisque ornare risus quis ligula. Phasellus tristique purus a augue condimentum adipiscing. Aenean sagittis. Etiam leo pede, rhoncus venenatis, tristique in, vulputate at, odio. Donec et ipsum et sapien vehicula nonummy. Suspendisse potenti. Fusce varius urna id quam. In eget purus. Integer turpis arcu, pellentesque eget, cursus et, fermentum ut, sapien. Fusce metus mi, eleifend sollicitudin, molestie id, varius et, nibh.
©20XX Mywebsite.com
As we can see above the Block Elements are all on new lines and in their own <div> tags. This is the structure of our HTML page and we would from this point use CSS to style it and make it look nice.
We have a few different tags here so let’s explain them all:
<html> (Opens up the entirety of the HTML document)
<head> (Opens up the head section of the document)
<title> (This is the title of the document. It shows up at the top of the web browser and on search engines)
<meta> (Is for meta data)
<link> (Because this document is calling external CSS this links it to the HTML document)
</head> (This is the closing head tag, thus closing off the head section and allowing us to move on to the body of the document where we can actually start adding visual blocks)
<body> (This opens the body of the document/web page)
<div class=”container”> (This is the opening of a div tag & container for other HTML elements it has been given a name “container” This container is made as the over all structure or container for all the content, we don’t close this tag yet because we still have more stuff to add into it)
<div class=”header”><a href=”#”>WebsiteName</a></div> (This is the header of the site (the top where the site name goes and is given the ID name “header” it also has its closing </div> tag to allow us to move on to the next block)
<div class=”menu”> (This is our block where the navigation is and its closing </div> tag to allow us to move on to the next block)
<div class=”sidebar”> (This is the side bar block but we don’t close it yet because we have more to add into it)
<h1>Welcome</h1> (this is some h1 text, h1 means its a heading so the text is bigger than normal text, this block is located inside the side bar div so it is opened “<h1>” and closed “</h1>” so we can than close the side bar)
</div> (This finally closes the side bar div)
<div class=”main”> (This is the main div and where the main content will go, we don’t close it because we need to add content in, we can close it after that)
<h2>Lorem ipsum dolor?</h2> (This is h2 text, it is a heading but not a main heading, h2 is used for secondary headings)
<p>Praesent aliquam, justo convallis luctus rutrum, erat nulla fermentum diam, at nonummy quam ante ac quam. Quisque ornare risus quis ligula. Phasellus tristique purus a augue condimentum adipiscing. Aenean sagittis. Etiam leo pede, rhoncus venenatis, tristique in, vulputate at, odio. Donec et ipsum et sapien vehicula nonummy. Suspendisse potenti. Fusce varius urna id quam.</p> (This text represents the main content text for the site and the <p> tag means Paragraph, each time you add a new <p> </p> you are making a new paragraph.
<h2>Suspendisse potenti?</h2> (This is h2 text, it is a heading but not a main heading, h2 is used for secondary headings)
<p>Quisque ornare risus quis ligula. Phasellus tristique purus a augue condimentum adipiscing. Aenean sagittis. Etiam leo pede, rhoncus venenatis, tristique in, vulputate at, odio. Donec et ipsum et sapien vehicula nonummy. Suspendisse potenti. Fusce varius urna id quam. In eget purus. Integer turpis arcu, pellentesque eget, cursus et, fermentum ut, sapien. Fusce metus mi, eleifend sollicitudin, molestie id, varius et, nibh.</p> (This is our second paragraph)
</div> (And here we close up all of the above content of the “main” div)
<div class=”footer”>©20XX Mywebsite.com</div> (This opens and closes the footer block)
</div> (And here we close up all of the above content of the “container” div)
</body> (Here we close up the body of the document)
</html> (Here we close up the whole HTML)
Comprehending all of this
At first, understanding and comprehending this markup might seem confusing. One way to think of it is like a Matryoshka doll.

All we are doing is building a hierarchy of containers to put content in. And as we finish adding content in, we close the tag and eventually get back to the top again closing the entire HTML document.
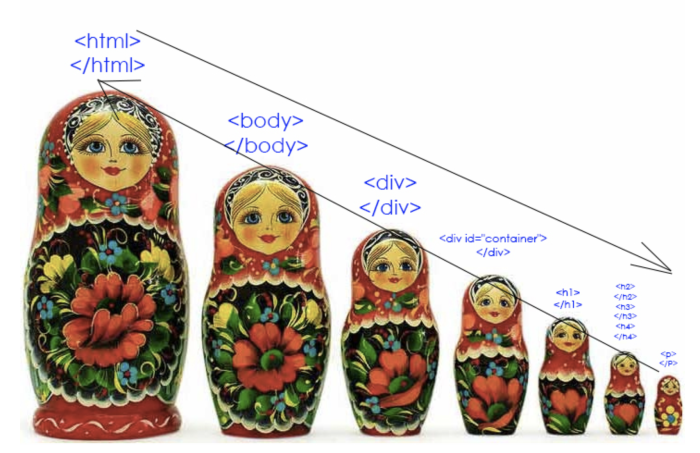
In the end closing up the first tag we made of the entire document <html>.
Common Tags
Structure:
<!DOCTYPE html> – This is the declaration of the HTML document. This is always the first thing in an HTML document on line 1.
<html> </html> – This is always on line 2. This is the structure of the entire HTML page. Everything within the HTML page must be contained within these opening and closing tags.
<head> </head> – This is the head section. This is where we can add various things like meta data and link to other files this page may need to work.
<body> </body> – This is where all of the content and structure for the web page will be within. Anything we are going to visually see on the web page will be in here.
<div> </div> – This is a divider tag. Think of it like an empty container you can put things in like more structure and content.
Example of what this will look like:
<!DOCTYPE html>
<html>
<head>
</head>
<body>
  <div>
  </div>
</body>
</html>
Writing text:
<h1> (content) </h1> – Heading 1 text
<h2> (content) </h2> – Heading 2 text
<h3> (content) </h3> – Heading 3 text
<h4> (content) </h4> – Heading 4 text
<h5> (content) </h5> – Heading 5 text
<h6> (content) </h6> – Heading 6 text
<p> (content) </p> – Paragraph Text
<a> (content) </a> – Makes the content within the tags a link
Creating Lists:
<ul> </ul> – Creates an unordered list (every list item <li> </li> tag within will be a bullet point)
<ol> </ol> – Creates an ordered list (every list item <li> </li> tag within will be a number point)
Example of the above:
<li>Item 1</li>
<li>Item 2</li>
<li>Item 3</li>
</ol>
Categorised in: Lectures, MDCP 102, WEBD 100
This post was written by amax