
WEBD 100 & MDCP 102 – Intro to CSS 1
April 2, 2024 12:03 pm Leave your thoughtsWHAT IS CSS?

CSS (Cascading style sheets) are the method in which websites (and developers) control visual & positioning aspects of a website’s front end. Think of a house, the house being built using HTML, The CSS would essentially be the interior design, controlling the colors of paint, floor style, furniture and positioning and so on. All the aspects of the visuals, colors for the different types of text (H1, H2, H3, H4 and so on, paragraph text, linked text, background colors, background images, positioning of different elements, fonts, and even animating certain elements can be controlled with CSS. The scope of CSS coding is very vast and you will forever be learning new things as you grow in your career, but for now we will start you off with the basics.
Remember the analogy for HTML being like the frame of a building? Well CSS is what makes the building look nice!
ANATOMY
CSS starts with a selector:
selector {
}
And then we add properties and values:
selector {
  property: value;
  property: value;
}
SELECTORS
There are different types of selectors but for now let’s just concentrate on a few.
Element (Tag) <h1>
div {
  (This is where your code will go);
}
Class <div class="class-name">
.class-name {
  (This is where your code will go);
  (This is where your code will go);
}
ID <div id="id-name">
#id-name {
  (This is where your code will go);
  (This is where your code will go);
  (This is where your code will go);
}
Each line of code must always end with a “;”. Also, many devs for the most part target elements using classes rather then ID’s. The reason being because Classnames can be shared and reused. ID’s cannot.
METHODS OF DEPLOYMENT
There are generally 2 methods used to add in CSS to your HTML files. Internal & external. For the most part we will be using external. For the sake of this course you want to always be using external CSS when you hand in a project.
INTERNAL
Adding internal CSS code is when you simply add CSS code into any HTML file, when doing this you always add the CSS code into the head tags. This method should only be used if you are making a 1 off page or not using a lot of CSS code. As you progress in your career you might start dealing with rather large CSS files with 100’s or even 1000 or more lines of CSS code, in that case you will always be dealing with external CSS files.
INTERNAL CSS EXAMPLE
<head>
  <style>
    body {
      background-color: #FFF;
    }
    h1 {
      color: #838383;
      margin-left: 40px;
    }
  </style>
</head>
*Note the “style” Tags. Your CSS that is embedded in a HTML page must be contained within the Head tags AND also contained in Style tags.
EXTERNAL
The second method is to call an external CSS file into an HTML page.
This method allows you to handle large amounts of CSS and keep it separate from your HTML file and keeps your projects more organized as well as keeps loading time quicker. To load an external CSS file, instead of adding code into the head tags, we call the CSS file in the head tags. All this does is tells our HTML page to call up and include the CSS code from its own separate file.
Dreamweaver also recognizes this while editing the HTML file it will in real time edit the CSS file if you make changes.
EXTERNAL CSS IMPORTED INTO HTML EXAMPLE
<head>
  <link href="css/style.css" rel="stylesheet" type="text/css">
</head>
INLINE
There is also an “inline” Method of adding CSS which is when you add in CSS directly onto an element in an HTML page. For example adding CSS to a H1 tag, However this method should be used sparingly, if at all. This is not a recommended method of using CSS.
INLINE CSS EXAMPLE
<h1 style="color:blue;margin-left:30px;">This is a heading.</h1>CODING ETIQUETTE
Just a quick example on keeping things organized.. As stated earlier, as you progress in your career, you will be dealing with larger and larger CSS files. With this being said you will want to get in the habit of keeping things clean and organized right off the cuff to make things easier for you in the long run. Always keep your code written line by line, having the CSS element at the top and the CSS properties written 1 property per line. Here’s an example:
html {
  margin: 0;
}
body {
  margin: 0;
}
h1 {
  margin: 0;
}
wrapper {
  width: 70%;
  border: 1px solid;
  border-color: #222;
  margin: auto;
  padding: 0px;
}
header {
  background-image: url(img/header.png);
  background-repeat: no-repeat;
  background-attachment: fixed;
  margin: 0;
  height: 500px;
}
nav li {
  display: inline-block;
  padding: 5px;
}
nav li a {
  text-decoration: none;
  font-size: 20px;
  font-family: sans-serif;
  color: #222;
}
h1,h2,h3,h4,h5,h6 {
  font-family: sans-serif;
}
p {
  font-family: sans-serif;
  font-size: 13px;
}
You want the end result of your code to be orderly and neat.
*Note* If you ever end up using a template or working on someone else’s work and the CSS code is not properly formatted there are free online tools you can use to quickly format a CSS file. We call this css beautify.
https://www.cleancss.com/css-beautify/
FONTS AND COLOR IN CSS
In CSS we can select the fonts and font styles/colors we want to use for the various classes of text on our sites.
As far as colors go, in CSS they are usually defined one of 3 ways:
- a color name – like “red”
- a HEX value – like “#ff0000”
- an RGB value – like “rgb(255,0,0)”
Personally I like to use HEX values, but any method works.
In this example, we are making text within the body selector black.
body {
  color: #000000;
}
You can also define heading text as well. Keep in mind this is good practice for SEO. These will be for titles, sub titles and so on. They are defined by H1, H2 and H3. H1 being for main titles, H2 for sub titles and H3 for other important blocks.
h1 {
  color: #000066;
}
h2 {
  color: #0000b3;
}
h3 {
  color: #6666ff;
}
Next we can add in the kind of font family we want and set other style attributes like the font size:
body {
  color: #000000;
  font-family: "Times New Roman", Times, serif;
  font-size: 12px;
}
CSS BACKGROUNDS
You can define how you want the background of a webpage to look, either using a color or using a background image or a combo of both. If you are using a background image it can either be a full image or a repeating image.
Using a color for the BG:
body {
  background-color: #555;
}
Using an image:
body {
  background-image: url("BG.gif");
}
*Note that when using a non repeating image, you must work with the image for it to look properly as widely as you can. On some screens the picture may be smaller and some screens larger. So for some users it might look fine on the website but some it might look odd and not fit properly. Keep this in mind when using this practice.
Using a repeating image:
body {
  background-image: url("gradient_bg.png");
  background-repeat: repeat-x;
}
*Note in some cases you will need to repeat-y instead depending on the nature of your repeating BG image.
repeating-x will repeat the image horizontally →
repeating-y will repeat the image vertically ↓
Using a fixed position for a background:
body {
  background-image: url("BG.png");
  background-repeat: no-repeat;
  background-attachment: fixed;
}
In this case the background image stays fixed in place and does not scroll with the site.
Sometimes you will need to use a mix of these codes to make things look right. For example, if you had a web page with a fixed BG lets say a light blue to white gradient that was placed at the top of the page and only extended to the middle of the page. The white at the bottom of the gradient would need to be continued below so you could make the BG under the gradient white to ensure it would always look proper.
body {
  background-image: url("BG.png");
  background-repeat: repeat-x;
  background-attachment: fixed;
  background-color: #fff;
}
CSS PADDING & MARGINS
PADDING
Padding creates space around elements in CSS. Here is an example.
padding-top: 15px;
padding-bottom: 15px;
Here I have taken out the padding in the navigation. This causes the nav links to squish up against each other and look awful. This can happen with any element on a webpage. You will have to add in some padding or take some away sometimes to make things look right.
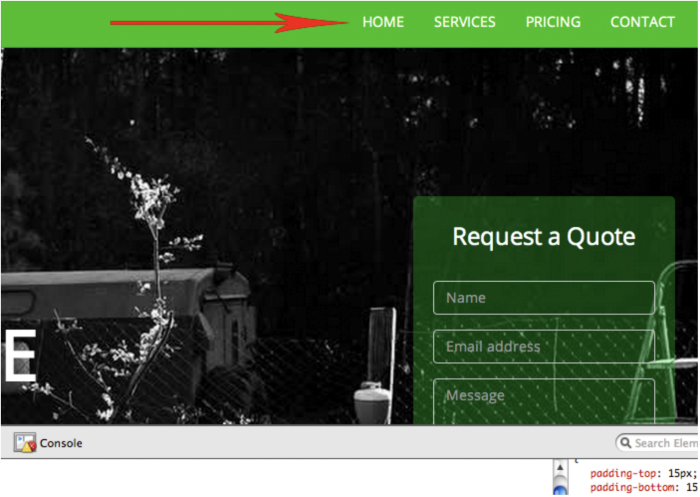
Now with the added padding the nav links look a lot better.
There are a few different ways it works, you can set the padding for each individual side or you can shorthand the code. Always think of it in a clockwise order: top right bottom left.
When setting the values for spacing you will use one of these methods:
- length – specifies a padding in px, pt, cm, etc.
- % – specifies a padding in % of the width of the containing element
- inherit – specifies that the padding should be inherited from the parent element
Let’s take a look at setting this for each individual side.
nav {
  padding-top: 10px;
  padding-right: 0px;
  padding-bottom: 50px;
  padding-left: 30px;
}
Here we can clearly see what’s what, each side will have the amount of respective padding coded.
Now let’s look at the shorthand code.
nav {
  padding: 10px 0px 50px 30px;
}
This is the same code as the above code but it is just shortened down. Either way they both do the same thing. At first it might be easier for you to use the 1st example.
You do not always need to use all 4 sometimes you can get away with using only what you need:
nav {
  padding-left: 30px;
}
MARGINS
*NOTE Working with margins is similar to working with padding, having both the regular and shorthand code.
nav {
  margin-top: 10px;
  margin-bottom: 0px;
  margin-right: 50px;
  margin-left: 30px;
}
nav {
margin: 10px 0px 50px 30px;
}All the margin properties can have the following values:
- auto – the browser calculates the margin
- length – specifies a margin in px, pt, cm, etc.
- % – specifies a margin in % of the width of the containing element
- inherit – specifies that the margin should be inherited from the parent element
Now, let’s take a closer look at the structure of the CSS and see what it is doing to our HTML in more depth to break it down.
Structure
Let’s look at the structure again to recap. We can see all our codes start with a selector, then an opening curly bracket, then the style codes ending with “;”, and ends with a closing curly bracket.
.selector {

}
Parts of a basic page
In this example the div’s are using ID’s so the selector will be a hashtag #. If they were classes we would use a “.” in place of the “#”.
body {
}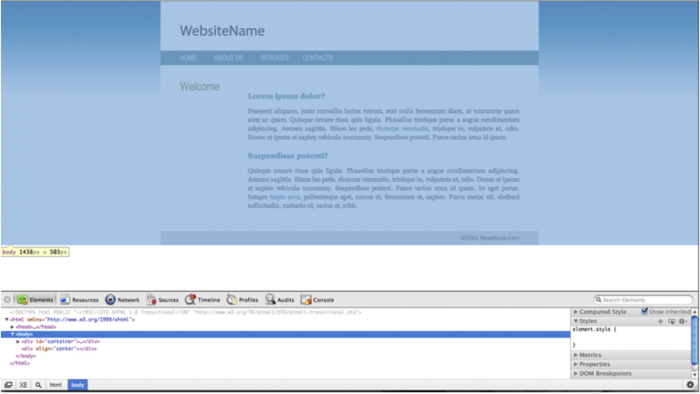
This is the entire body of the webpage. For example styling this with a color will make the background of the website the color defined.
.container {
}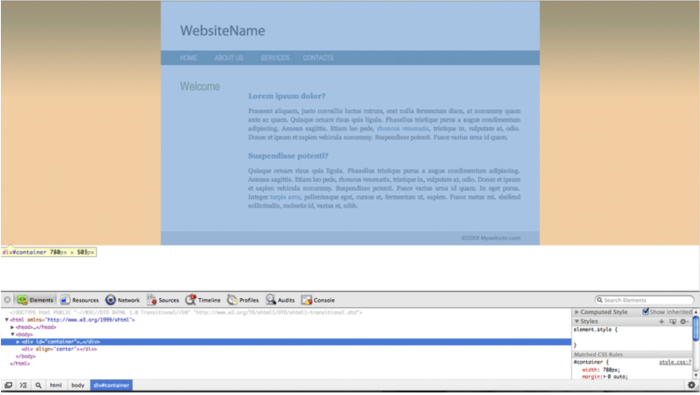
This is the container of the content on the site. Codes in here will alter the contents within the container as a whole.
.header {
}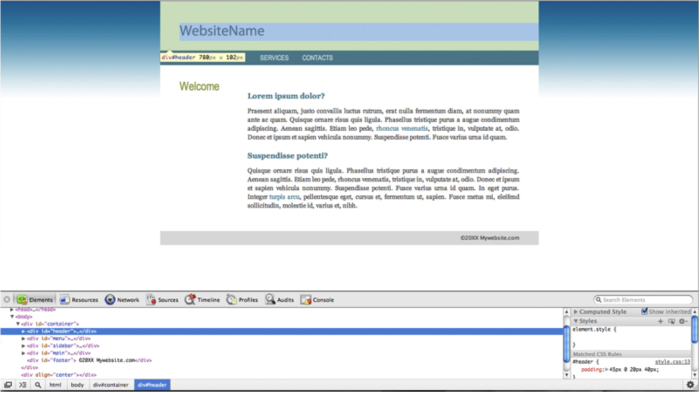
This is the header. Codes in here will alter the contents of the header.
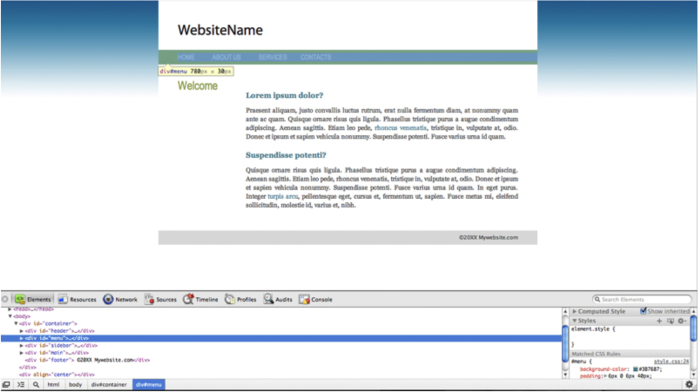
.menu {
}
This is the menu. Codes in here will alter the contents of the menu area as a whole.
.menu a {
}
This specifies the actual links in the menu area, so altering this will reflect on the actual menu links. *Note anytime you see a selector name with an “a” after it, it means that it is referring to links within that section. “menu a:” “sidebar a” “main a” and so on.
.menu a:hover {
}
This specifies the behaviour of the menu items when the mouse is hovering over the menu item. Using code in here is not necessary but if you want you could for example make the color of the link change when the mouse is hovering over it.
.sidebar {
}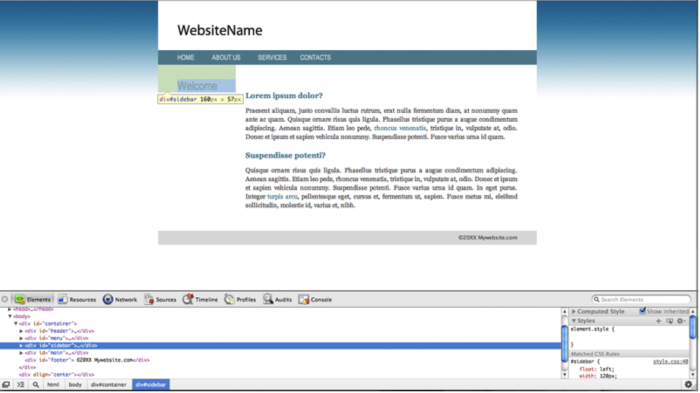
This is the sidebar area. Adding code in here will alter the sidebar area as a whole.
.main {
}
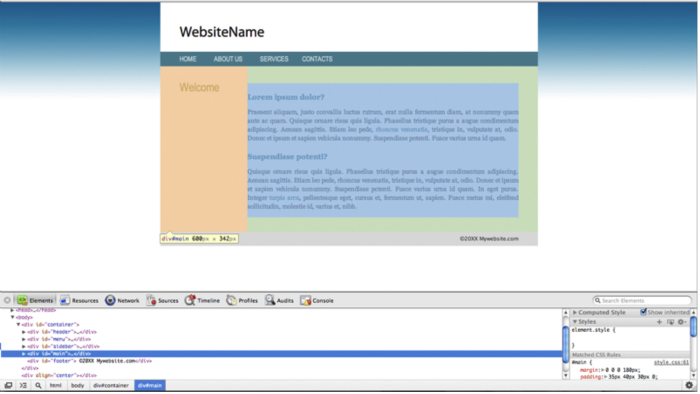
This is referring to the main area of the webpage where the general content will go. Adding code in here, for example making the text 12px will make all the text in this area as a whole that size.
.footer {
}
This is referring to the footer of the site.
Basic CSS Codes
Backgrounds
background: #FFFFFF; This is telling the background to be white.
background-image: url(/public_html/images/BG.png); This is defining a background image (located in the public_html/images folder from the site root).
background-repeat: repeat; This is telling the background image to repeat on all axis.
background-repeat: repeat-x; This is telling the background image to repeat on only the X Axis (Horizontally).
background-repeat: repeat-y; This is telling the background image to repeat on only the Y Axis (Vertically).
background-position: top; This is telling the background image to sit at the top of the page.
background-position: bottom; This is telling the background image to sit at the bottom of the page.
background-position: left; This is telling the background image to sit on the left of the page.
background-position: right; This is telling the background image to sit on the right of the page.
background-attachment: fixed; This is telling the background image to stay fixed in place and not scroll with the content of the web page.
Example:
body {
  background-image: url(/public_html/images/BG.png);
  background-repeat: repeat-x;
}
In this example:
There is a background image
Repeating on the X Axis (Horizontally)
Fonts
font-family: "Arial Narrow", "Myriad Pro"; This is telling the given font to be the specified font family.
font-size: 24px; This is defining the font size.
font-weight: normal; This defines the boldness of the font, in this example is not bold.
font-weight: bold; This defines the boldness of the font, in this example is bold.
font-style: normal; This defines the font style, in this case its normal.
font-style: italic; This defines the font style, in this case its italic.
text-transform: capitalize; This will transform all text to caps.
text-transform: lowercase; This will transform all text to be lowercase.
text-decoration: underline This will add a text decoration. In this case its underline.
text-decoration: line-through This will add a text decoration. In this case its strikethrough.
text-align: center; This will make the text oriented to in the center
text-align: left; This will make the text oriented to the left
text-align: right; This will make the text oriented to the right
text-shadow: #999; This will make a shadow for the text in this case the shadow color is medium grey.
color: #869843; This would define what color you want the text to be.
Example:
.menu a {
  color: #c5d6db;
  text-decoration: none;
  font-size: 14px;
  font-family: "Arial Narrow", "Myriad Pro";
}
In this example we are telling the selector (in this case the selector is the menu links) to:
- Be a light greyish bluish color.
- With no text decoration at all.
- To be 14px in font size
- To be Arial narrow. And if the users computer does not have arial narrow, be Myriad Pro.
*Note When you specify a font family, the website relies on the users computer to have that font installed on the computer to use it, if it does not it will choose another font from that font family, when we specify “Arial Narrow”, “Myriad Pro” the computer uses “Arial Narrow” 1st, if the computer does not have this font installed, it will defer to the next on the list “Myriad Pro”. When choosing fonts using this method you should always use “web safe” fonts. In the case that you use a non web safe font and the users computer does not have it installed, it will use a default font.
Spacing & Placing
float: left; This is telling the selected object to sit to the left of the screen. (If its in a container or a table it will sit to the left inside the container or table)
float: right; This is telling the selected object to sit to the right of the screen. (If its in a container or a table it will sit to the right inside the container or table)
width: 780px; This is defining a width of the selected object.
In closing. Because of the nature of coding as a whole, there is no way to learn every code possible in a lesson, semester or even course. The goal is to be acquainted with the code structure and be familiar in general, this will allow you to expand on your coding skills and understand what things are doing thus allowing you to learn new code. You will never stop learning any language of code just like any spoken language. You must be resourceful and when you run into something new, or want to find a new solution to a task search. Google is your friend and you can always find solutions online. There are millions of resources online to help you along the way.
Resources
https://www.w3schools.com/cssref/default.asp
https://www.w3schools.com/CSSref/css_units.asp
http://bitdev.ca/learn/lectures/
Categorised in: Lectures, MDCP 102, WEBD 100
This post was written by amax